Hi there!
I am currently in the process of moving the blog over to wordpress.
You can find me over there at myrecipeboxandotherseasonings.wordpress.com
Wednesday 26 March 2014
Tuesday 25 March 2014
A Simple Minecraft Party
O had his sleepover birthday party this past weekend. The theme he wanted.....Minecraft. No surprise there, the boy is obsessed (remember the Minecraft mask post?).
Well, let me tell you, there are NO Minecraft decorations to be purchased in store. There are some invitations and other small things that can be purchased from Etsy, but I was not willing to go that route and I also found them rather expensive for what you were getting.
So, I took to trusty Pinterest to see what I could find to do myself. I managed to put together a nicely decorated and inexpensive party room, make a nice cake, and a huge success with goodie bags.
First I will show you decorations. I kept it simple, the boys would be in the dining room (party room) for pizza, cake and gifts, so this was the only room I decorated. The rest of the time they were up in O's bedroom playing Minecraft on their devices, or watching a movie in the living room.
I know nothing about this game (still) as I mentioned in my Halloween mask post, but I managed to get some good ideas both from Pinterest and by questioning O about certain aspects of the game.
These are my TNT decorations. They were as simple as wrapping a couple of boxes in red wrapping paper. I used a hot glue gun to attach white ribbon, but you could also use construction paper if you didn't have any ribbon. I used a sharpie for the writing, and black ribbon on the top for the "charge". Again, you could use any black materials you have laying around for the charge part.
 I hit up the Dollar Store for tableware. I got a green and a blue table plastic table cloth, green square plates, green napkins, and green cups.

For the cups I grabbed my trusty sharpie and drew Creeper faces (some sort of bad guy) on them.

My best find was square pieces of grass, perfect for the middle of the table.

I served homemade pizza, cut in to squares of course. Unfortunately I forgot to take a picture of that part.
The cake was a hit! It was a chocolate dirt clump cake, iced with a chocolate buttercream frosting. I used Oreo baking crumbs over top of the icing on the sides to get the dirt look. The grass part on the top is vanilla buttercream icing with green food colouring. I used a Wilton grass tip to get the grass effect. For the cake I used this recipe from housewife2hostess. It really is a good chocolate cake, and easy to make. The recipe will make two layers, I ended up wanting a third layer as it wasn't quite tall enough.

And the goodie bags! I was quite pleased with myself on this one. O is 10, and I didn't want to do a goodie bag with the typical little toys that always get thrown out, and seriously, what ten year old really wants those?
The bags required a morning of trip in to town. I got green paper bags and hit up the bulk food store for supplies. On the bags I drew another Creeper face, and filled the bags with candies that represent items on Minecraft! Here is a link that tells you different items used in the game and what they represent.

I put more candy in than what you see in the picture! But there are gummy fish, and sour melons which satisy hunger in the game. There is chocolate rocks/gravel which is used for mining or building in the game. And last but not least, gold wrapped mini chocolate bars. Gold is used for crafting, and currency.

There you go, I hope that this post gave you some easy, inexpensive ideas that you can do on your own!
Well, let me tell you, there are NO Minecraft decorations to be purchased in store. There are some invitations and other small things that can be purchased from Etsy, but I was not willing to go that route and I also found them rather expensive for what you were getting.
So, I took to trusty Pinterest to see what I could find to do myself. I managed to put together a nicely decorated and inexpensive party room, make a nice cake, and a huge success with goodie bags.
First I will show you decorations. I kept it simple, the boys would be in the dining room (party room) for pizza, cake and gifts, so this was the only room I decorated. The rest of the time they were up in O's bedroom playing Minecraft on their devices, or watching a movie in the living room.
I know nothing about this game (still) as I mentioned in my Halloween mask post, but I managed to get some good ideas both from Pinterest and by questioning O about certain aspects of the game.
These are my TNT decorations. They were as simple as wrapping a couple of boxes in red wrapping paper. I used a hot glue gun to attach white ribbon, but you could also use construction paper if you didn't have any ribbon. I used a sharpie for the writing, and black ribbon on the top for the "charge". Again, you could use any black materials you have laying around for the charge part.
My best find was square pieces of grass, perfect for the middle of the table.
I served homemade pizza, cut in to squares of course. Unfortunately I forgot to take a picture of that part.
The cake was a hit! It was a chocolate dirt clump cake, iced with a chocolate buttercream frosting. I used Oreo baking crumbs over top of the icing on the sides to get the dirt look. The grass part on the top is vanilla buttercream icing with green food colouring. I used a Wilton grass tip to get the grass effect. For the cake I used this recipe from housewife2hostess. It really is a good chocolate cake, and easy to make. The recipe will make two layers, I ended up wanting a third layer as it wasn't quite tall enough.
And the goodie bags! I was quite pleased with myself on this one. O is 10, and I didn't want to do a goodie bag with the typical little toys that always get thrown out, and seriously, what ten year old really wants those?
The bags required a morning of trip in to town. I got green paper bags and hit up the bulk food store for supplies. On the bags I drew another Creeper face, and filled the bags with candies that represent items on Minecraft! Here is a link that tells you different items used in the game and what they represent.
I put more candy in than what you see in the picture! But there are gummy fish, and sour melons which satisy hunger in the game. There is chocolate rocks/gravel which is used for mining or building in the game. And last but not least, gold wrapped mini chocolate bars. Gold is used for crafting, and currency.
There you go, I hope that this post gave you some easy, inexpensive ideas that you can do on your own!
Wednesday 26 February 2014
A Sandwich Bread Tutorial
I told myself that I had to sit down today and write this post since I took the pictures for it already!
Since I got my KitchenAid Mixer and got over my fear of making bread I have been making it weekly. I am proud to say that I have not bought a single loaf of bread since Christmas!
I use a recipe that I found on hubpages. Easy to follow directions, and the bread turns out great everytime. I went to pull up my recipe last week, and I could not find it Cue panic!
Luckily, I had written the recipe down, but I like to have pretty pictures to follow along with, so I thought I would do a post about it, and then I can always find my recipe and pictures. :) This recipe will make two loaves.
Ingredients
1/2 cup milk
3 Tbsp sugar
2 tsp salt
3 Tbsp butter
2 packages active dry yeast (or 4.5 tsp of bulk yeast)
1.5 cups warm water (105*- 115*F)
5-6 cups flour (I use 5.5)
Combine your milk, sugar, salt and butter in a pot on low heat until the butter meats. Cool to lukewarm (105-115*) A digital thermometer is your best friend when making bread. You can do it without, I find it much easier to use one though.

Warm your mixing bowl by swirling hot water and dumping it. Add 1.5 cups warm water and dissolve yeast in it. Whisk it up with a fork to help it along. It will start to look like this pretty quickly.

Add your lukewarm milk mixture and 4.5 cups of the flour to the bowl. Attach your dough hook and mix at the lowest speed for two minutes.
Continue mixing at the same speed while adding the rest of the flour (5.5 cups is what I use). Add 1/2 cup at a time until the dough clears the sides of the bowl and sticks to the hook. Continue to knead for another 3-5 minutes after this until the dough is smooth and elastic.

Turn your dough in to a large greased bowl. You want to actually put your dough in the bowl, turn it in a circle and then flip it.

You will cover the bowl and set it to rise for an hour. You can use either plastic wrap or a clean dish towel. It needs to be in a warm area free from drafts. If you put it in your oven with the light on this is the best place. This next picture is after the rise!

Punch your dough down a couple of times to release air. Divide it in half. You can use a kitchen scale if you want to be precise, I normally just eyeball it.
Sprinkle your work surface with flour. One ball at a time roll out to approximately 9"x14"

Now you fold it into thirds along the long edge. Wipe off excess flour and then tightly roll dough up. Pinch the seams and the ends.


Put in two greased loaf pans seam side down. Cover and rise again until doubled. This usually takes another hour. The next two photos are before and after the rise.


Remove the pans from the oven and then heat the oven to 400*. Bake for 30 minutes until they are golden brown.
Take the loaves out of the pans right away and cool on wire racks. You know that your loaves are done when you tap the bottom and it sounds hollow. Enjoy!

Since I got my KitchenAid Mixer and got over my fear of making bread I have been making it weekly. I am proud to say that I have not bought a single loaf of bread since Christmas!
I use a recipe that I found on hubpages. Easy to follow directions, and the bread turns out great everytime. I went to pull up my recipe last week, and I could not find it Cue panic!
Luckily, I had written the recipe down, but I like to have pretty pictures to follow along with, so I thought I would do a post about it, and then I can always find my recipe and pictures. :) This recipe will make two loaves.
Ingredients
1/2 cup milk
3 Tbsp sugar
2 tsp salt
3 Tbsp butter
2 packages active dry yeast (or 4.5 tsp of bulk yeast)
1.5 cups warm water (105*- 115*F)
5-6 cups flour (I use 5.5)
Combine your milk, sugar, salt and butter in a pot on low heat until the butter meats. Cool to lukewarm (105-115*) A digital thermometer is your best friend when making bread. You can do it without, I find it much easier to use one though.
Warm your mixing bowl by swirling hot water and dumping it. Add 1.5 cups warm water and dissolve yeast in it. Whisk it up with a fork to help it along. It will start to look like this pretty quickly.
Add your lukewarm milk mixture and 4.5 cups of the flour to the bowl. Attach your dough hook and mix at the lowest speed for two minutes.
Continue mixing at the same speed while adding the rest of the flour (5.5 cups is what I use). Add 1/2 cup at a time until the dough clears the sides of the bowl and sticks to the hook. Continue to knead for another 3-5 minutes after this until the dough is smooth and elastic.
Turn your dough in to a large greased bowl. You want to actually put your dough in the bowl, turn it in a circle and then flip it.
You will cover the bowl and set it to rise for an hour. You can use either plastic wrap or a clean dish towel. It needs to be in a warm area free from drafts. If you put it in your oven with the light on this is the best place. This next picture is after the rise!
Punch your dough down a couple of times to release air. Divide it in half. You can use a kitchen scale if you want to be precise, I normally just eyeball it.
Sprinkle your work surface with flour. One ball at a time roll out to approximately 9"x14"
Now you fold it into thirds along the long edge. Wipe off excess flour and then tightly roll dough up. Pinch the seams and the ends.
Put in two greased loaf pans seam side down. Cover and rise again until doubled. This usually takes another hour. The next two photos are before and after the rise.
Remove the pans from the oven and then heat the oven to 400*. Bake for 30 minutes until they are golden brown.
Take the loaves out of the pans right away and cool on wire racks. You know that your loaves are done when you tap the bottom and it sounds hollow. Enjoy!
Tuesday 21 January 2014
Bruschetta Chicken and I miss summer
I miss summer. As I look out my window at all the snow, and feel the -23*C (-32with windchill), I can imagine the warm sun and green grass.
I am itching to get in to my gardens. Unfortunately, we have at least another two and a half to three months of winter left to get through.
So, I decided to bring a little summer to our dinner, and make bruschetta chicken. I had to go out and buy the tomatoes and basil instead of plucking it from the garden, but it was still good eats.
You can do your chicken however you want, grilled, roasted, pan fried. I wanted to grill, but did not want to shovel off the BBQ, so roasting it was. I used boneless, skinless chicken breasts. The meal was finished off with some cheesy potatoes, and steamed green beans and broccoli. It was all gobbled up.
I am not a fan of raw onions, as in if I get any in my mouth I cannot choke it down, I start gagging and have to spit it out, so my bruschetta recipe does not have onions. If you want to know how I make the rest for bruschetta, scroll to below the photo.
Bruschetta (this makes a large batch, you can easily half the recipe)
6 or 7 ripe roma tomatoes
2 cloves of garlic minced
1 Tbsp extra virgin olive oil
1 tsp balsamic vinegar
6-8 fresh basil leaves chopped
salt and freshly ground black pepper, to taste
Start by destemming and deseeding your tomatoes, then chop in small pieces. Some people will remove the skins, I never have, and honestly, I don't notice much of a difference whether they are on or off.
Mix in all other ingredients and let it sit while you prepare the chicken. The longer it sits, the more the tomatoes take up the yummy balsamic flavouring.
Salt and pepper your chicken and prepare how you like. I baked mine covered at 350 for about a half hour.
When it is done plate it and add your bruschetta mix to the top. And voila!

To make bruschetta:
Make your tomato mix and let it sit.
Take a loaf of small crusty bread and cut on a diagonal. Brush olive oil on one side of the bread and put on a cookie sheet, oil side down.
Toast at 450* for 4-6 minutes, until the bottoms are a slight toasty brown. Arrange bread on a plate toasted side up and either add toppings or keep the bowl out beside the bread for people to load themselves.
I am itching to get in to my gardens. Unfortunately, we have at least another two and a half to three months of winter left to get through.
So, I decided to bring a little summer to our dinner, and make bruschetta chicken. I had to go out and buy the tomatoes and basil instead of plucking it from the garden, but it was still good eats.
You can do your chicken however you want, grilled, roasted, pan fried. I wanted to grill, but did not want to shovel off the BBQ, so roasting it was. I used boneless, skinless chicken breasts. The meal was finished off with some cheesy potatoes, and steamed green beans and broccoli. It was all gobbled up.
I am not a fan of raw onions, as in if I get any in my mouth I cannot choke it down, I start gagging and have to spit it out, so my bruschetta recipe does not have onions. If you want to know how I make the rest for bruschetta, scroll to below the photo.
Bruschetta (this makes a large batch, you can easily half the recipe)
6 or 7 ripe roma tomatoes
2 cloves of garlic minced
1 Tbsp extra virgin olive oil
1 tsp balsamic vinegar
6-8 fresh basil leaves chopped
salt and freshly ground black pepper, to taste
Start by destemming and deseeding your tomatoes, then chop in small pieces. Some people will remove the skins, I never have, and honestly, I don't notice much of a difference whether they are on or off.
Mix in all other ingredients and let it sit while you prepare the chicken. The longer it sits, the more the tomatoes take up the yummy balsamic flavouring.
Salt and pepper your chicken and prepare how you like. I baked mine covered at 350 for about a half hour.
When it is done plate it and add your bruschetta mix to the top. And voila!
To make bruschetta:
Make your tomato mix and let it sit.
Take a loaf of small crusty bread and cut on a diagonal. Brush olive oil on one side of the bread and put on a cookie sheet, oil side down.
Toast at 450* for 4-6 minutes, until the bottoms are a slight toasty brown. Arrange bread on a plate toasted side up and either add toppings or keep the bowl out beside the bread for people to load themselves.
Wednesday 15 January 2014
A Delicious New Cookie
I had a couple of browning bananas sitting on my counter that I needed to use, and I wanted to dry something different instead of the same old banana bread.
I thought, how about a banana cookie of some sort. So I went searching, and found a recipe for banana chocolate chip cookies. It didn't look too hard, and who doesn't like chocolate chips?
Oh my goodness, they are delicious, like little soft banana cakes! I am not a huge sweets/dessert eater, but even I had to have more than one!
They lasted a total of three days, and I have already had a request to bake some more!
Banana Chocolate Chip Cookies
1/2 cup butter softened
1 cup mashed bananas (I used three in this recipe)
2 large eggs
1 cup light brown sugar
1 cup white granulated sugar
2 tsp vanilla
1 tsp salt
1 1/2 tsp baking soda
4 1/2 cups flour
1 12oz bag chocolate chips (I used chocolate chunks dh had brought home from work and ended up using two cups)
In a large mixing bowl combine the butter and banana. Add the brown and white sugars in and cream together. Add the eggs and vanilla and beat until just mixed. Add the flour, baking soda and salt and mix well. Add the chocolate chips and make sure they are mixed in well.
Use a small scoop to scoop on to an ungreased cookie sheet. They should be about 2" apart. Warning, the batter will be sticky, if you need to use your fingers try really hard not to lick them clean!
Bake at 325* for 13-14 minutes, or until bottoms are a light brown. Let stand on cookie sheet for a couple of minutes before transferring to a wire rack.
If you need to stack them to store, use a piece of wax paper in between layers or they will stick together.
 You have to try one of these when they are cooled down just enough to eat. The chocolate chips are all melty and warm, so good!
I thought, how about a banana cookie of some sort. So I went searching, and found a recipe for banana chocolate chip cookies. It didn't look too hard, and who doesn't like chocolate chips?
Oh my goodness, they are delicious, like little soft banana cakes! I am not a huge sweets/dessert eater, but even I had to have more than one!
They lasted a total of three days, and I have already had a request to bake some more!
Banana Chocolate Chip Cookies
1/2 cup butter softened
1 cup mashed bananas (I used three in this recipe)
2 large eggs
1 cup light brown sugar
1 cup white granulated sugar
2 tsp vanilla
1 tsp salt
1 1/2 tsp baking soda
4 1/2 cups flour
1 12oz bag chocolate chips (I used chocolate chunks dh had brought home from work and ended up using two cups)
In a large mixing bowl combine the butter and banana. Add the brown and white sugars in and cream together. Add the eggs and vanilla and beat until just mixed. Add the flour, baking soda and salt and mix well. Add the chocolate chips and make sure they are mixed in well.
Use a small scoop to scoop on to an ungreased cookie sheet. They should be about 2" apart. Warning, the batter will be sticky, if you need to use your fingers try really hard not to lick them clean!
Bake at 325* for 13-14 minutes, or until bottoms are a light brown. Let stand on cookie sheet for a couple of minutes before transferring to a wire rack.
If you need to stack them to store, use a piece of wax paper in between layers or they will stick together.
Tuesday 7 January 2014
A Month of Elf on the Shelf
Elf on The Shelf was a new tradition that I brought in this year, and I had so much fun doing it! The boys loved waking up every morning to see what "Bob" had done the night before, and even the daycare kids ran right in to look for Bob as soon as they got here.
For those of you who do not know what the heck I am talking about, take a look here
Basically, the elf is sent by Santa to a family to help Santa with his naughty and nice list. The elf watches through the day, and once everyone is asleep he returns to the North Pole to report to Santa. The parents move Bob to a different spot each night for the kids to find in the morning, and he stays there for the day.
When you purchase your elf, he/she will come with a hardcover book that tells the story, and this year there was even a tv special. The book says that when your elf comes you need to give him a name. You are not allowed to touch the elf as he/she will lose his magic and will not be able to return to the North Pole. You can talk to your elf and tell him your wishes, and he will tell them to Santa.
"Bob" was the name that O and B gave our Elf. B was a lot more in to the whole experience than O. B would talk to Bob all the time. O just looked for him every morning.
Our elf was a mischevious elf, not just hanging out in different spots. I think that made it more fun for the boys. Near the end it was getting harder to think of ideas, but Pinterest was a great help with that.
And now for the pictures! This will be picture heavy, there is a month of mischief to record! Some are my own ideas, and some are ideas I found on Pinterest.
Sunday 5 January 2014
New Year, Resolutions, and Rambling
Hi all, I am back!
The Christmas holidays got the best of me and I did not have much time to get on and post. My New Years Resolution is to be a better, more consistent blogger. I hope to post at minimum twice a week.
Christmas was a busy time. Between working, doing daycare, baking, shopping, having five (!) different Christmases, and shovelling lots and lots of snow, I was glad when New Years came and everything wound down.
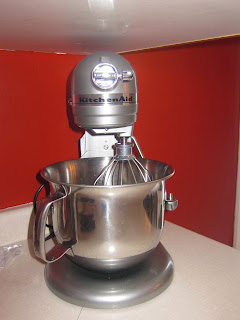
My favourite present this year was my Kitchenaid stand mixer. I broke it in on Christmas morning by beating my eggs in it! Isn't she pretty?
 With Christmas money that I got from the husbands parents I also bought myself a brand new set of good quality pots and pans.
I pretty much had a kitchen Christmas, but I am absolutely okay with that.
I will be doing a post on a new tradition that we brought in this year, Elf on the Shelf. It was so much fun, and the kids loved it! I am forewarning you that that will be a picture heavy post.
My mixer has been getting a lot of use. I am happy to say that I conquered my fear of yeast, and have made bread, and cinnamon buns, and currently have dough for crusty buns rising. I always had this fear of doing something wrong and the dough not rising, and the amount of work that seemed to go in to bread making.
These are my first attempts at bread, I think they turned out great, and it is almost gone already, so I know it tastes good!
 The recipe I used was very easy to follow. If you are a first time bread maker with a stand mixer I highly recommend this recipe. You can find it here.
I think that is about all for now. How was your holiday season?
The Christmas holidays got the best of me and I did not have much time to get on and post. My New Years Resolution is to be a better, more consistent blogger. I hope to post at minimum twice a week.
Christmas was a busy time. Between working, doing daycare, baking, shopping, having five (!) different Christmases, and shovelling lots and lots of snow, I was glad when New Years came and everything wound down.
My favourite present this year was my Kitchenaid stand mixer. I broke it in on Christmas morning by beating my eggs in it! Isn't she pretty?

I pretty much had a kitchen Christmas, but I am absolutely okay with that.
I will be doing a post on a new tradition that we brought in this year, Elf on the Shelf. It was so much fun, and the kids loved it! I am forewarning you that that will be a picture heavy post.
My mixer has been getting a lot of use. I am happy to say that I conquered my fear of yeast, and have made bread, and cinnamon buns, and currently have dough for crusty buns rising. I always had this fear of doing something wrong and the dough not rising, and the amount of work that seemed to go in to bread making.
These are my first attempts at bread, I think they turned out great, and it is almost gone already, so I know it tastes good!

I think that is about all for now. How was your holiday season?
Subscribe to:
Posts (Atom)